
Hi
I’ve been using Ossec as Intrusion Detection System for year. Ossec is awesome service for detection and notification. Thus I’ve decided to build a cyber threat monitoring system with open source technologies. In order to do that, I decided to get logs from Ossec and send them to the Elasticsearch engine. This write-up going to be about installation of Ossec and Logstash/ElastichSearch and integration between of these services.
Technologies
Operating System
I used Centos 6.x x64 bit minimal iso on 4gb ram, 150gb SSD disk and 4 CPU VPS server. Everything going to be installed this server.
ZeroMQ as Messaging Service
We have to collect logs from Ossec and send them to Logstash. There is a few different way to do that but I decided to use ZeroMQ because Ossec and Logstash has a support for ZeroMQ. Ossec with ZeroMQ is able to parsing fields from log data.Also tracing file and try to parse it with logstash is not easy, for me at least.
Our plan is Ossec going to start ZeroMQ service at localhost with specified port. Logstash going to be subscriber on that server and get log data directly from Ossec.
ElasticSearch
Nothing to say about it.. We will be using latest version of ELS.
Kibana ( with secure Nginx Installation )
I will explain Nginx configuration for kiban. We need to enable some extra security features in order to keep kibana in secure!
Let start.
Installation of Required Libs
Before do anything, lets install developments tools and update our Centos server.
yum groupinstall "Development tools"
Lets start with installation of libzmq. Please execute following commands in order to install latest version of libzmq
cd /root
git clone https://github.com/zeromq/libzmq.git
cd libzmq
bash autogen.sh
./configure
make
make install
cd ..
That’s it. Now please execute following commands for stable ZeroMQ version ( zeromq4-x ) installation.
git clone https://github.com/zeromq/zeromq4-x.git
cd zeromq4-x
bash autogen.sh
./configure
make
ake install
cd ..
Optional Step:
You may getting following error while trying to run bash autogen.sh .
configure.ac:55: error: Autoconf version 2.64 or higher is required
You gotta instal higher version of autoconf by following below steps.
$ wget http://ftp.gnu.org/gnu/autoconf/autoconf-2.69.tar.gz
$ tar xvfvz autoconf-2.69.tar.gz
$ cd autoconf-2.69
$ ./configure
$ make
$ sudo make install
If you want to use ZeroMQ feature of Ossec, you should install czmq library otherwise you wont be able to compile ossec. Let’s install czmq with following commands.
git clone git://github.com/zeromq/czmq.git
cd czmq
bash autogen.sh
./configure
make
make install
cd ..
Ossec Installation
First of all, I won’t describe details of install.sh process of Ossec because of it’s pretty good documented at online. (
git clone –b stable https://github.com/ossec/ossec-hids.git
cd ossec-hids
cd src
make setzeromq
cd ..
bash install.sh
cd ..
Most important thing here is enabling zeromq. Please do not forget execute 4th line.
I will be using ossec with english language.
  ** Para instalação em português, escolha [br].
  ** 要使用中文进行安装, 请选择 [cn].
  ** Fur eine deutsche Installation wohlen Sie [de].
  ** Για εγκατάσταση στα Ελληνικά, επιλέξτε [el].
  ** For installation in English, choose [en].
  ** Para instalar en Español , eliga [es].
  ** Pour une installation en français, choisissez [fr]
  ** A Magyar nyelvű telepítéshez válassza [hu].
  ** Per l'installazione in Italiano, scegli [it].
  ** 日本語でインストールします.選択して下さい.[jp].
  ** Voor installatie in het Nederlands, kies [nl].
  ** Aby instalować w języku Polskim, wybierz [pl].
  ** Для инструкций по установке на русском ,введите [ru].
  ** Za instalaciju na srpskom, izaberi [sr].
  ** Türkçe kurulum için seçin [tr].
  (en/br/cn/de/el/es/fr/hu/it/jp/nl/pl/ru/sr/tr) [en]: en
We are installing ossec as a server. Please choose “server”.
1- What kind of installation do you want (server, agent, local, hybrid or help)? server
/var/ossec is pretty good location for ossec. I wont change it. Press enter and move another step.
2- Setting up the installation environment.

 - Choose where to install the OSSEC HIDS [/var/ossec]:
I will enable email notification.
3- Configuring the OSSEC HIDS.

  3.1- Do you want e-mail notification? (y/n) [y]: y
   - What's your e-mail address? mehmet@mehmetince.net
   - What's your SMTP server ip/host? 127.0.0.1
Enable integrity check.
  3.2- Do you want to run the integrity check daemon? (y/n) [y]: y

   - Running syscheck (integrity check daemon).
And ofcourse enable rootkit detection.
  3.3- Do you want to run the rootkit detection engine? (y/n) [y]: y

   - Running rootcheck (rootkit detection).
I will not enable active response it.
- Do you want to enable active response? (y/n) [y]: n
Ossec ZeroMQ Configuration
Please add following line into <global> xml tag. (/var/ossec/etc/ossec.conf)
<zeromq_output>yes</zeromq_output>
<zeromq_uri>tcp://127.0.0.1:5556/</zeromq_uri>
Ossec going to take 5556 tcp port for publish mode. We will configure logstash as a subscriber mode. We are ready to start ossec service.
chkconfig --add ossec
/var/ossec/bin/ossec-control start
In order to be sure about zeromq services that started by ossec, please execute following command and you should see one single as output
netstat -tnlp|grep 5556
Elasticsearch
First thing first. We need java.
yum install java-1.7.0-openjdk
Now we are free to go. Let’s add elasticsearch’s repo and install it.
rpm --import http://packages.elasticsearch.org/GPG-KEY-elasticsearch
Create elasticsearch.repo file under the /etc/yum.repos.d/ folder and add following lines into that file.
vi /etc/yum.repos.d/elasticsearch.repo

[elasticsearch-1.3]
name=Elasticsearch repository for 1.3.x packages
baseurl=http://packages.elasticsearch.org/elasticsearch/1.3/centos
gpgcheck=1
gpgkey=http://packages.elasticsearch.org/GPG-KEY-elasticsearch
enabled=1
Install ELS and add it into startup services list.
yum install elasticsearch
chkconfig --add elasticsearch
/etc/init.d/elasticsearch start
Now open /etc/elasticsearch/elasticsearch.yml and add following lines end of yml file.
network.bind_host: 127.0.0.1
network.publish_host: 127.0.0.1
network.host: 127.0.0.1
and restart elasticsearch service.
Optional : If you see “permission denied on key ‘vm.max_map_count’” error remove/disable following from /etc/init.d/elasticsearch file.
if [ -n "$MAX_MAP_COUNT" ]; then
   sysctl -q -w vm.max_map_count=$MAX_MAP_COUNT
fi
Installation Kibana + Nginx with Security
We need epel repo for nginx and install it with httpd-tools package.
wget http://dl.fedoraproject.org/pub/epel/6/x86_64/epel-release-6-8.noarch.rpm
rpm -Uvh epel-release-6*.rpm
yum update
yum install nginx httpd-tools
chkconfig --add nginx
Kibana does not have authentication mechanism. That means anyone can access Kibana directly from outside. Thus, enabling HTTP Auth is good solution.
htpasswd -c /etc/nginx/conf.d/kibana.htpasswd YOURUSERNAME
PS: Don’t forget that max lenght is 8 for htpasswd.
Now it’s time to install Kibana
cd /usr/share/nginx/html/
mkdir yourdomain.com
cd yourdomain.com
wget https://download.elasticsearch.org/kibana/kibana/kibana-3.1.1.tar.gz
tar xzvf kibana-3.1.1.tar.gz
mv kibana-3.1.1 kibana
rm -rf kibana-3.1.1.tar.gz
Nginx will be located as reverse proxy mode. Following configuration can be found here also gist ( https://gist.github.com/mmetince/b0d44cc14e4c4c10cd64 )
# Nginx proxy for Elasticsearch + Kibana
#
# In this setup, we are password protecting the saving of dashboards. You may
# wish to extend the password protection to all paths.
#
# Even though these paths are being called as the result of an ajax request, the
# browser will prompt for a username/password on the first request
#
# If you use this, you'll want to point config.js at http://FQDN:443/ instead of
# http://FQDN:9200
#
# Thanks : https://gist.github.com/thisismitch/2205786838a6a5d61f55
#
server {
  listen                *:443 ;

  server_name           website.com;
  access_log            /var/log/nginx/website.com.access.log;
  error_log             /var/log/nginx/website.com.error.log;

  ssl on;
  ssl_protocols  SSLv2 TLSv1; # Also you can Remove SSLv2-3 because of security hole!
  ssl_ciphers  ALL:!ADH:!EXPORT56:RC4+RSA:+HIGH:+MEDIUM:+LOW:+SSLv2:+EXP;
  ssl_prefer_server_ciphers   on;
  ssl_certificate /etc/pki/tls/certs/website.com.crt;
  ssl_certificate_key /etc/pki/tls/private/website.com.key;


  location /kibana {
    root  /usr/share/nginx/website.com/;
    index  index.html  index.htm;
	auth_basic "Restricted";
    auth_basic_user_file /etc/nginx/conf.d/kibana.htpasswd;
  }

  location ~ ^/_aliases$ {
    proxy_pass http://127.0.0.1:9200;
    proxy_read_timeout 90;
  }
  location ~ ^/.*/_aliases$ {
    proxy_pass http://127.0.0.1:9200;
    proxy_read_timeout 90;
  }
  location ~ ^/_nodes$ {
    proxy_pass http://127.0.0.1:9200;
    proxy_read_timeout 90;
  }
  location ~ ^/.*/_search$ {
    proxy_pass http://127.0.0.1:9200;
    proxy_read_timeout 90;
  }
  location ~ ^/.*/_mapping {
    proxy_pass http://127.0.0.1:9200;
    proxy_read_timeout 90;
  }

  # Password protected end points
  location ~ ^/kibana-int/dashboard/.*$ {
    proxy_pass http://127.0.0.1:9200;
    proxy_read_timeout 90;
    limit_except GET {
      proxy_pass http://127.0.0.1:9200;
      auth_basic "Restricted";
      auth_basic_user_file /etc/nginx/conf.d/kibana.htpasswd;
    }
  }
  location ~ ^/kibana-int/temp.*$ {
    proxy_pass http://127.0.0.1:9200;
    proxy_read_timeout 90;
    limit_except GET {
      proxy_pass http://127.0.0.1:9200;
      auth_basic "Restricted";
      auth_basic_user_file /etc/nginx/conf.d/kibana.htpasswd;
    }
  }
}
Also before move forward, you should generate certificate for kibana and locate them as described nginx configuration.
Please execute following lines for be sure cert’s owner and permissions.
chmod go-rwx /etc/pki/tls/certs/yoursslcert.crt
chmod go-rwx /etc/pki/tls/private/yoursslcert.key
We need to do small changes on Kibana config.js file. Please open /usr/share/nginx/html/yourdomain/kibana/config.js file and set elasticsearch: to following one. So Kibana GUI can access ELS without having any problem.
elasticsearch: "https://"+window.location.hostname
Installation of LogStash
UPDATE : Since the Logstash made changes on their ffi-rzmq gem package, this section is NOT necessary to follow. ( https://github.com/logstash-plugins/logstash-input-zeromq/pull/1 ). I haven’t test lastest version of Logstash but it seems this problem is not exist anymore.
Everything should be okay until now. But logstash have a lot of bug about using zeromq.. I’ve spend a day for figure it out. Let me explain what I’ve tried
Goal
We want to connect Ossec’s zeromq service and get log stream from it.
Issues
First of all, I’ve installed logstash from repo which was 1.3.x version. When I’ve run service it couldn’t connect ossec’s service. Because Logstash using ffi-rzmq 1.0.0 version gem package and it’s incompatible with libzmq 4.x library. I found a issue ticket about it ( over here ) . They said that they solved this issue on 2.0.1 version.
I thought that ffi-rzmq issue must be solved on logstash stable version ( 1.4.x right now ) . I’ve download logstash tarball and start service but I saw that latest version is using ffi-rzmq with 1.0.0 again.
After few hours I’ve found this issue ticket ( https://github.com/elasticsearch/logstash/issues/1870 ) . Last comment is “you are right about the gemspec role, if you update the version in the gemspec and runbin/logstash deps the library will be updated. If you manage to test it, please add your result to #1366this would help getting it merged.” which means they know that issue and try to fix it. I decided to change version to 2.0.1 from 1.0.0 on gemspec file and build my own tarball.
Let’s build our own logstash tarball. PS : 1.4 is stable version right now.
git clone -b 1.4 https://github.com/elasticsearch/logstash.git
cd logstash/
Now open logstash.gemspec file and do following changes.
# Found ffi-rzmq file and change 1.0.0 to 2.0.1
vi logstash.gemspec

# FROM
gem.add_runtime_dependency "ffi-rzmq", ["1.0.0"]

# TO
gem.add_runtime_dependency "ffi-rzmq", ["2.0.1"]
Lets fetch dependencies which includes ffi-rzmq with 2.0.1 version.
# Install
make vendor-jruby
USE_JRUBY=1 bin/logstash deps
This will take few minutes. You probably see outputs like that…
Fetching gem metadata from https://rubygems.org/.......
Fetching additional metadata from https://rubygems.org/..
Resolving dependencies..................
Installing i18n 0.6.9
Installing multi_json 1.8.4
Installing activesupport 3.2.17
Installing addressable 2.3.5
Installing atomic 1.1.15
Installing avl_tree 1.1.3
Installing awesome_print 1.2.0
Installing json 1.8.1
Installing mini_portile 0.5.2
....
Installing ffi-rzmq-core 1.0.3
Installing ffi-rzmq 2.0.1 (was 1.0.0)
....
It’s finished. We are free to make our own tarball with following command.
# Make tarball
make tarball
Output will be like this.
# Output will be like this

=> Fetching kibana
curl -s -L -k -o - https://download.elasticsearch.org/kibana/kibana/kibana-3.0.1.tar.gz | tar -C vendor/kibana -zx --strip-components=1
=> Ensuring ruby gems dependencies are in vendor/bundle...
=> Fetching ua-parser regexes.yaml
=> Preparing tarball
make[1]: Entering directory `/root/logstash'
mkdir build/tarball
mkdir build/tarball/logstash-1.4.3.dev-modified
make[1]: Leaving directory `/root/logstash'
=> tarball ready: build/logstash-1.4.3.dev-modified.tar.gz
Let’s move tarball to another directory and excrat files
mv build/logstash-1.4.3.dev-modified.tar.gz /root/logstash-1.4.3.dev-modified.tar.gz
cd /root/
tar xzvf logstash-1.4.3.dev-modified.tar.gz
cd logstash-1.4.3.dev-modified
Sample Logstash Config for Ossec
We are ready. Let’s do some tests.. Create sample file /etc/sample.conf
input {
        zeromq {
                type     => 'zmq'
                topology => 'pubsub'
                address  => 'tcp://127.0.0.1:5556'
                mode     => 'client'
        }
}

output {
   stdout {
                codec => "rubydebug"
   }
   elasticsearch_http {
                host => "127.0.0.1"
                index   => "ossec-logstash-%{+YYYY.MM.dd}"
   }
}
And start logstash with following command.
bin/logstash -f /tmp/sample.conf
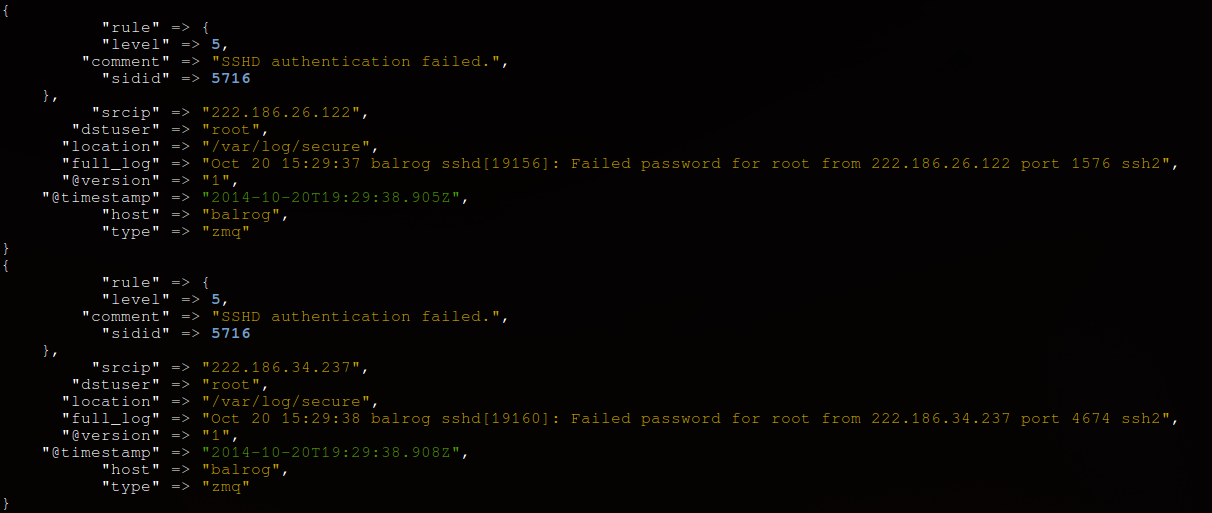
YAY! Logstash working like a charm.. Following screenshot grabbed from output of logstash
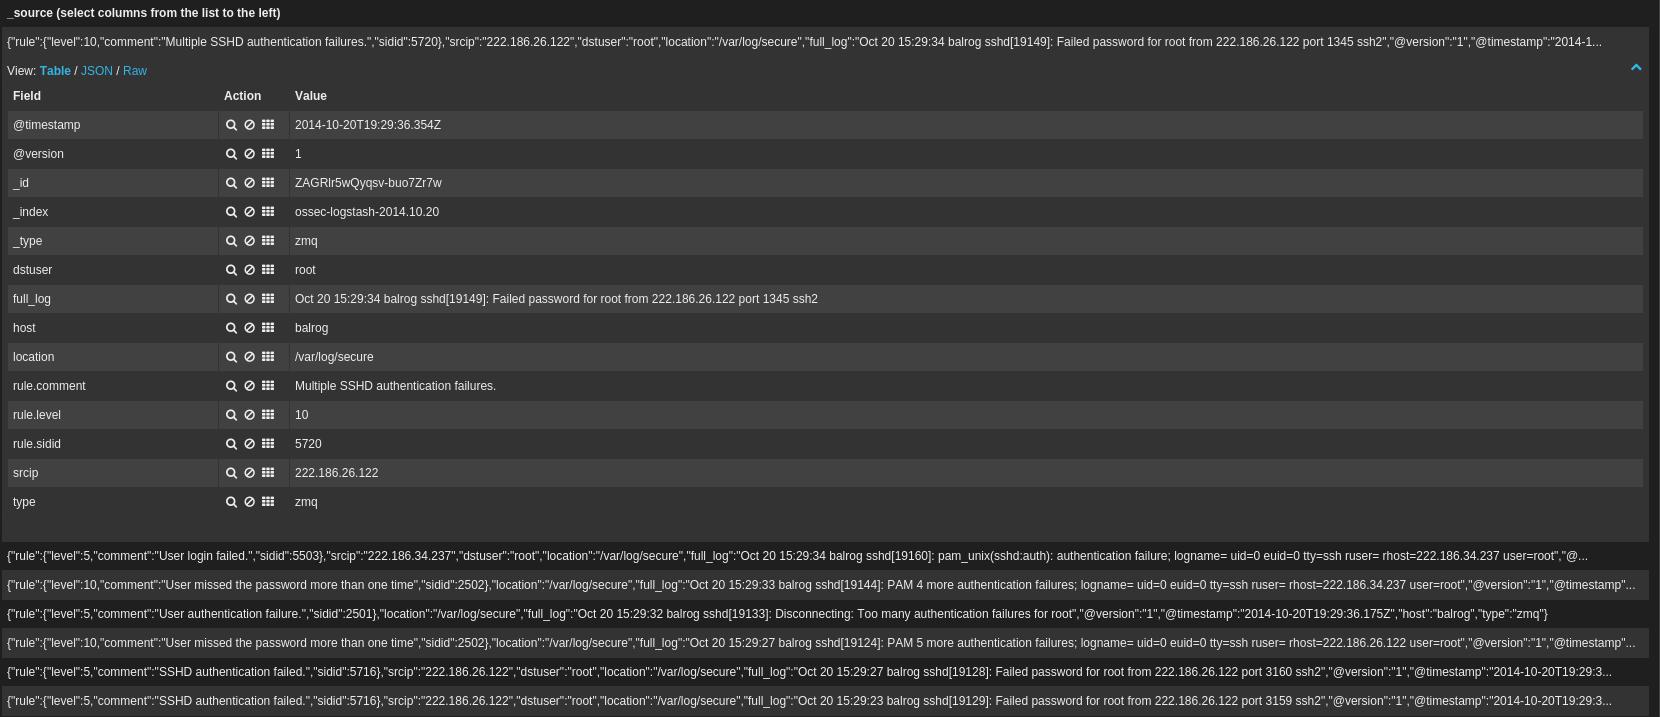
Let’s check out Kibana. Please go https://yourdomain.com/kibana and enter your username & password that we generated at previous section.
Init.d Script For Logstash
Following commands will move logstash folder to under /opt folder and create init.d script for logstash.
# Just in case
rm -rf /root/logstash
mv /root/logstash /opt/

# Init.d Script

cat << 'EOF' > /etc/init.d/logstash
#!/bin/sh
### BEGIN INIT INFO
# Provides: Logstash 1.4 init.d script
# Required-Start: $network
# Required-Stop: $network
# Default-Start: 2 3 4 5
# Description: Starts the Logstash 1.4
### END INIT INFO
export HOME=/opt/logstash
case "$1" in
'start')
/opt/logstash/bin/logstash -f /opt/logstash/conf/ > /var/log/logstash.log 2>&1 &
;;
'stop')
/usr/bin/kill -9 `ps auxww |grep logstash |grep logstash.conf | awk '{print $2}'`
;;
'restart')
/etc/init.d/logstash stop
/etc/init.d/logstash start
;;
*)
echo "Usage: $0 { start | stop |restart }"
;;
esac
exit 0
EOF

# Script file perms
chmod +x /etc/init.d/logstash
chkconfig --add logstash
Benefits of Using ZeroMQ instead of File as Logstash Input
As you can see, important field such as rule_comment, rule_level, srcip, dstuser are already coming as parsed from Ossec ZeroMQ. That means we do not need to work on parse file data. We have attacker ip address named as srcip so we can easily enable logstash geo_ip feature. Also if you want to strip out more information. You can find everything else on full_log variable. Also index can be changes depends on attack type.
Thanks
You would like to say a “big” thank you to Jeremy Rossi ( @jrossi ) who developed zeromq feature of Ossec!
References
http://pragmasec.wordpress.com/2014/07/14/set-up-ossec-with-kibana-and-logstash/
http://vichargrave.com/ossec-log-management-with-elasticsearch/
http://vichargrave.com/improved-ossec-log-parsing-with-logstash/